I did it again. I stumbled upon an idea on Pinterest, and not only did I do it, I really did it!
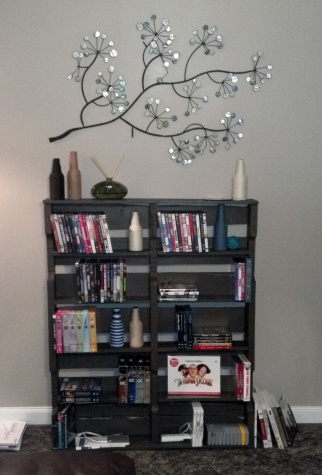
Like I said, I found my inspiration for this project on Pinterest via The Domestic Doozie. I really liked the idea and I think her project turned out nicely, but it didn’t quite suite me. So, being the creative genius I am, I took her concept and improvised. Combining The Domestic Doozie’s idea, my need for a larger media shelf, my frugal tendencies (i.e. my refusal to spend $40 on a media shelf), my leftover paint supplies from my entertainment center makeover last summer, and a week off of from work, I got everything I wanted in a media shelf, and then some. Plus, it matches my entertainment center. Pretty awesome, right?
If you’re curious on how I did this, here’s what I did:
- Found a pallet for dirt cheap on Craigslist :: $3
- Pried off the boards on the side I wanted to be open :: $16 (for the crowbar)
- Nailed 2 of the pried off boards to the ends to create a top and bottom
- Took the other pried off boards (and wood leftover from another project) to Lowe’s and had them cut the wood to the needed dimensions :: FREE – the guys at Lowe’s like me 🙂
- Glued the shelves in, crossing my fingers they were level
- Added small L-brackets under each of the shelves, just to ensure the shelves would stay in place :: $8 for L-brackets
- Primed it (and boy did the pallet soak up the primer!)
- And finally, painted it
Total cost :: $11 + $16 crowbar (which is more of an investment than a direct shelf cost)
Now when I first put my DVDs on the shelf, it felt quite bare (perhaps because I nearly quadrupled the size of my pervious shelf), but I felt that because my shelf turned out so amazing, I had to do something to fill it. So I, (1) ordered two more seasons of Beverly Hills, 90210 on Amazon and (2) did another Pinterest project.
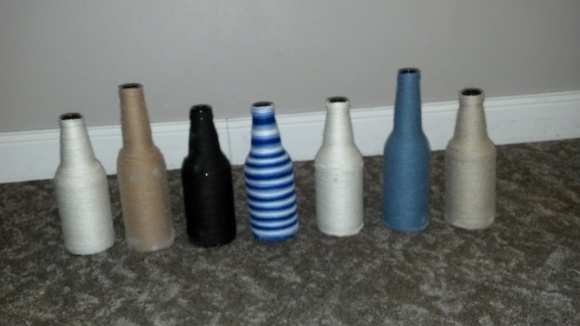
Lucky for me, my roommates and I enjoy the occasional beer, so we had plenty of empty beer bottles in our recycling. And again, lucky for me, the last time I was home, my mom gave me a huge bag of yarn balls (accumulated through her crafty years), so this project was completely free to me, But back to the project, I just wrapped beer bottles in yarn, with the occasional splash of glue to help hold the yarn in place. I still need to add a teal/jade color to really integrate the bottles into my living room decor, but I thought these were a good start.
In addition to accumulating more DVDs, I still have two more Pinterest-inspired projects that I’d like to incorporate into my new media shelf, but for now, I think this will suffice. And, don’t feel bad if you get jealous, you should — I’m still amazed by how well it turned out, in fact, sometimes when I’m in my living room, I just sit and stare at its magnificence.


[…] taste and style. The middle sister asked me to create smaller canvases for her entertainment shelf (a DIY project!) that matched the colors and wall art in her living room. With nothing but small photos on my […]
[…] year, I turned a pallet into a media shelf. It still impresses me how well it turned out, and I still catch myself looking at my awesome […]
[…] back the middle turned a pallet into a media stand. Naturally, I wanted to do the same. Not only is it functional, it’s beyond super cute and […]